Documentation
Back to homeGetting Started
- Download the DMG file from the website and open it.
- Drag OS Engine into your Applications folder.
- Open OS Engine from Applications. The main window will appear showing your wallpaper library.
- Use the status bar icon (top right of your menu bar) to Show/Hide the window anytime.
First-Time Setup
- Activate your license in Preferences → General → License (or use trial mode).
- Enable video wallpapers in macOS settings (see below).
- Add your first wallpaper from the Library view.
Enable Video Wallpapers
On macOS, ensure System Settings → Desktop & Dock → Desktop & Stage Manager → Show Items is set to On Desktop. This must be ON for video wallpapers to appear on your desktop.
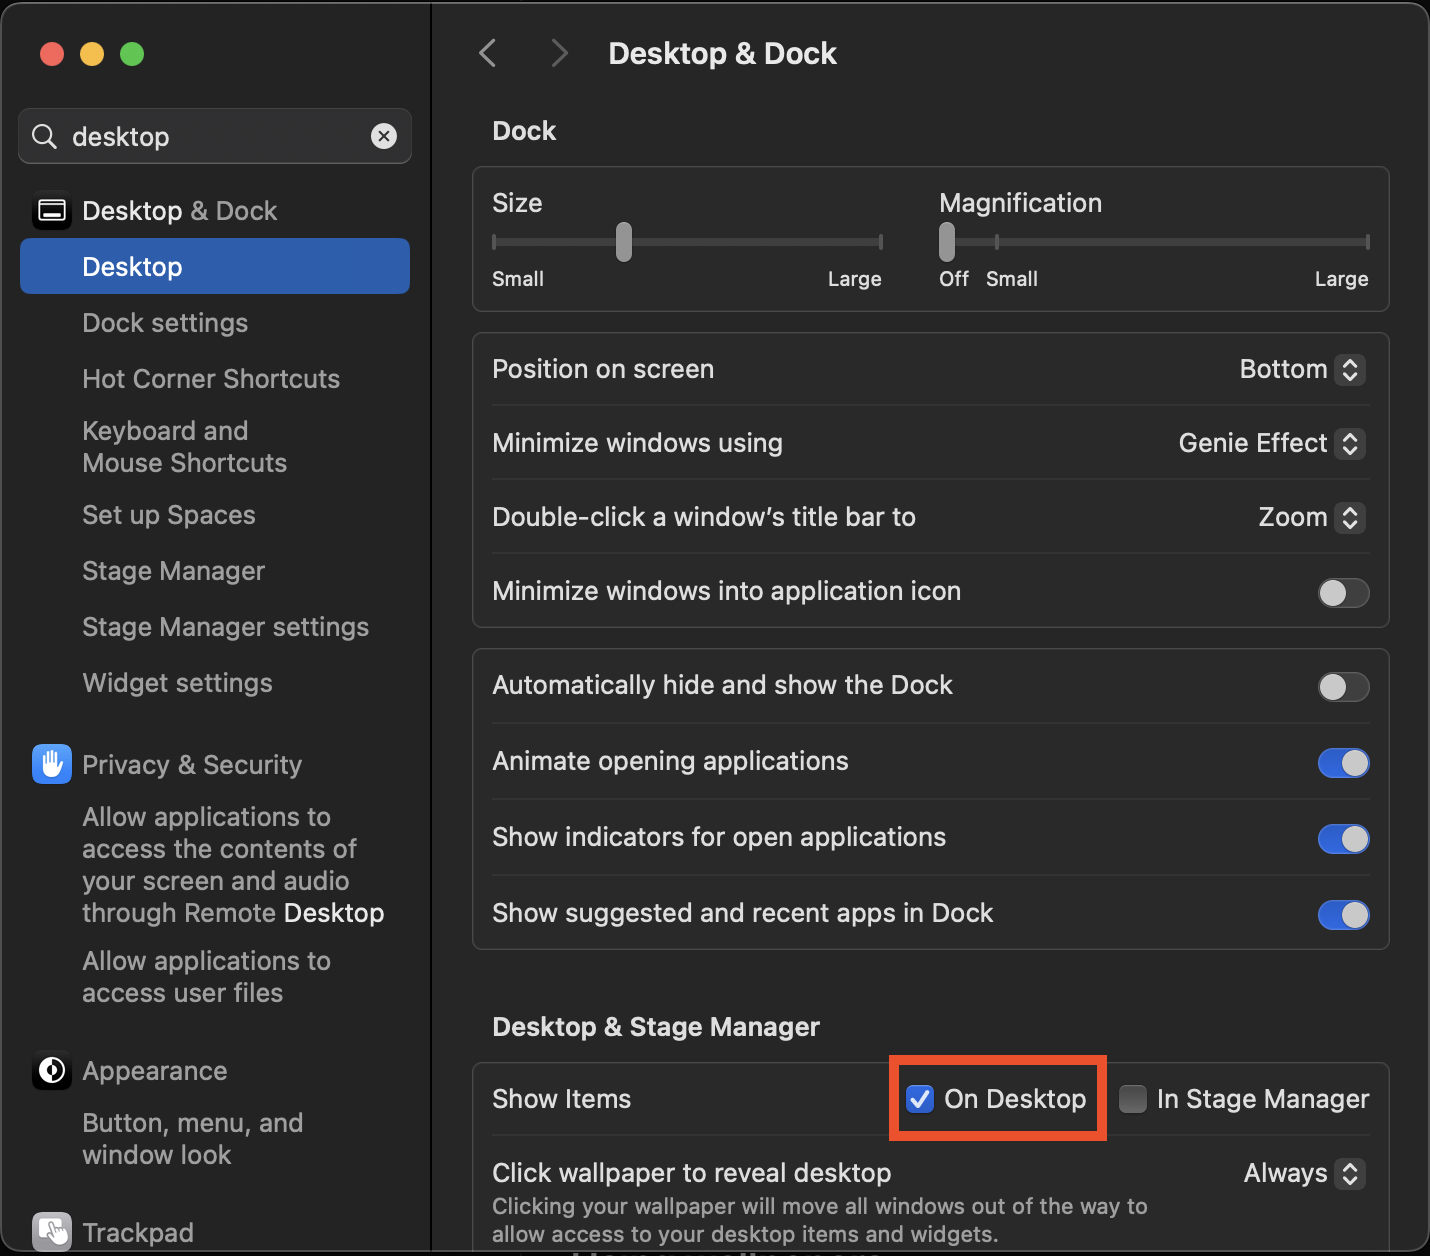
Note: If this setting is off, your video wallpapers won't display. This is a macOS requirement for desktop content.
Adding Wallpapers
OS Engine supports multiple types of wallpapers: videos, images, web pages, and community submissions from the Marketplace.
Import Video
- Click the + button in the main window or use the "Import Video" button.
- Select a video file (.mp4, .mov, .m4v, .webm).
- The video will be added to your library and can be assigned to displays.
- Videos loop automatically and play at 60fps for smooth playback.
Import Image
- Click the + button and select "Import Image".
- Choose an image file (.jpg, .png, .heic, etc.).
- Images can be enhanced with HTML overlays in the Editor.
Search Wallhaven
- Click the + button to open the Discover view.
- Enter search terms (e.g., "nature", "anime", "abstract") in the search field.
- Click "Search" to browse results from Wallhaven's API.
- Select wallpapers and click "Add Selected" to import them.
- Browse categories using the "Browse Categories" button.
Web Wallpapers
Create live web-based wallpapers using HTML/CSS/JavaScript. Perfect for dashboards, maps, or interactive art.
- Open the Editor (right-click a wallpaper → Edit).
- Click "Add HTML" and paste your HTML snippet.
- Ensure your HTML has a transparent background.
- Save and apply to use as a web wallpaper.
Wallpaper Editor
The Editor is a powerful tool for creating custom wallpapers with HTML overlays, animations, and keyframes.
Opening the Editor
- Right-click any wallpaper in your library and select "Edit".
- Or select a wallpaper and click the "Edit" button in the detail view.
- The Editor opens in a new window with a viewport, inspector, and timeline.
Editor Interface
- Viewport: The main canvas showing your wallpaper and overlays in real-time.
- Inspector: Edit HTML code, position elements, and adjust properties.
- Timeline: Add keyframes for animations (position, scale, rotation, opacity).
- Versions Bar: Manage multiple versions of your wallpaper project.
Working with HTML Overlays
- Click "Add HTML" in the toolbar.
- Paste your HTML snippet or use the AI generator (see Ollama section).
- Elements appear in the viewport and can be selected, dragged, and resized.
- Edit HTML code in the Inspector panel on the right.
- Click "Save Version" to create a named version, or "Save & Apply" to immediately set as wallpaper.
Keyframes & Animation
Animate HTML elements over time using keyframes. The timeline supports multiple property tracks.
- Select an element in the viewport.
- In the timeline, add keyframes for Position X/Y, Scale X/Y, Rotation, or Opacity.
- Move the playhead to set keyframe values at different times.
- Animations interpolate smoothly between keyframes.
Versions
- Save multiple versions of your wallpaper project for easy comparison.
- Rename versions by right-clicking in the versions bar.
- Load any version to restore a previous state.
- Versions are stored per wallpaper and persist across app restarts.
HTML Overlays
Overlays are standard HTML/CSS/JS snippets rendered over your video or image wallpaper. You can add them in the Editor via Add HTML, or generate with the built‑in Ollama integration.
Overlay Guidelines
- Use a single root container sized to the canvas:
<div style="position:absolute;left:0;top:0;width:100vw;height:100vh">…</div> - For each widget, absolutely position inside the root (the editor lets you drag/resize).
- To make an overlay interactive (click/hover/keyboard), include
data-interactiveon any element or add the HTML comment<!-- interactive -->anywhere in your snippet. - Prefer
pointer-events: nonefor purely visual overlays. When the engine detects your interactive marker, it automatically enables pointer events on your overlay so clicks/hover work. - Keep backgrounds transparent; avoid forcing
bodyto opaque colors.
Interactive Examples
Here are examples of interactive overlays:
<!-- interactive -->
<!-- Pulsing circle that reacts to hover -->
<div data-interactive style="position:absolute;left:40px;top:40px;width:140px;height:140px;border-radius:50%;background:#35a2ff66;transition:transform .2s">
  <script>
    const el = document.currentScript.parentElement;
    el.addEventListener('mouseenter', () => el.style.transform = 'scale(1.15)');
    el.addEventListener('mouseleave', () => el.style.transform = 'scale(1)');
  </script>
</div>
<!-- interactive -->
<!-- Clock widget (updates every second) -->
<div id="clock" data-interactive style="position:absolute;right:40px;top:40px;padding:10px 14px;border-radius:8px;background:#00000055;color:#fff;font:14px system-ui">
00:00
<script>
const box = document.getElementById('clock');
setInterval(() => {
const d = new Date();
box.textContent = d.toLocaleTimeString();
}, 1000);
</script>
</div>Three.js Overlays
Enable the Three.js toggle in Preferences → General → Performance & Behavior, then use the Editor's "Three.js Scene" button to insert a template. You can tweak JSON parameters (geometry, color, rotation) in the Inspector panel. Note: for interactive Three scenes, also add data-interactive to your root element.
Performance Tips
- Prefer CSS transforms/opacity for animations; avoid heavy reflows.
- Throttle timers and avoid unnecessary network requests in overlays.
- Keep images small; host static assets on a CDN where possible.
- Use
requestAnimationFramefor smooth animations.
AI-Assisted HTML Generation (Ollama)
Generate HTML overlays using natural language prompts with a local Ollama installation. This feature uses multimodal models (like gemma3) that can analyze screenshots for context-aware generation.
Setup
- Install Ollama from ollama.com.
- Pull a multimodal model:
ollama pull gemma2:2borollama pull gemma2:9b - Open Preferences → Integrations → Ollama.
- Set Base URL (default:
http://localhost:11434). - Select your default model from the dropdown (auto-discovered).
- Enable "Send screenshot to multimodal models" if using gemma3 or similar.
Using the Generator
- Open the Editor for any wallpaper.
- Click "Generate HTML with AI" in the toolbar.
- Enter a natural language prompt (e.g., "Create a clock widget in the top right corner").
- If screenshot context is enabled, the current wallpaper preview is sent to the model.
- Click "Generate" and wait for the HTML to be created.
- Review and edit the generated HTML in the Inspector if needed.
- Position and resize the element in the viewport.
Tips for Better Results
- Be specific about positioning ("top right", "center", "bottom left").
- Describe visual style ("dark theme", "transparent background", "rounded corners").
- Mention interactivity needs ("clickable", "hover effect", "updates every second").
- Enable screenshot context for better spatial understanding.
Marketplace
Browse community-created wallpapers, import with one click, and share your own creations. Each submission is reviewed; approved works appear instantly in the in‑app browser.
Signing In
- Open Marketplace from the main window (cart icon) or via File → Marketplace.
- Sign in with your license key (set in Preferences → Integrations → Marketplace).
- Trial users can browse but cannot upload wallpapers.
- Your account email is used for marketplace authentication.
Browsing
- Browse wallpapers in the "Browse" tab.
- Use the search bar to find specific wallpapers.
- Filter by tags using the tag input field.
- Preview wallpapers before importing.
- Click "Import" to add a wallpaper to your library.
- Wallpapers with HTML overlays are imported with their overlays intact.
Uploading
- Go to "My Profile" tab in Marketplace.
- Click "Upload Wallpaper".
- Select a video or image file (max 110 MB).
- Add a title and optional description.
- Optionally include an HTML overlay (paste code or select from Editor).
- Add a preview image (recommended for better listings).
- Add tags for discoverability.
- Submit for review. You can upload up to 15 wallpapers per account.
Upload Limits
- Maximum 15 wallpapers per account.
- Maximum 110 MB per file.
- Statuses: Pending → Approved/Rejected.
- Rejected submissions can be updated and resubmitted.
Multi-Monitor Support
Assign different wallpapers to each display or span a scene across all monitors.
Assigning Wallpapers
- Select a wallpaper in your library.
- In the detail view, click "Assign to Display".
- Choose a specific display or "All Displays".
- View current assignments in Preferences → Displays.
Managing Assignments
- Go to Preferences → Displays to see all displays and their assignments.
- Clear assignments for individual displays.
- Use "Reapply Now" to refresh all assignments.
- Preview wallpapers on specific displays from the Displays preferences.
Automation
Automatically pause wallpapers based on system state or app focus to save battery and reduce distractions.
Global Automation
Enable in Preferences → Automation:
- Pause on Battery: Automatically pause animated wallpapers when running on battery power.
- Pause in Fullscreen: Pause when any app enters fullscreen mode.
Per-App Automation
- Go to Preferences → Automation.
- Enable "Enable Automation" toggle.
- Browse running apps in the left panel (or search by name/bundle ID).
- Select an app, then toggle "Pause when this app is active".
- Paused apps appear in the list below. Remove rules by clicking the trash icon.
Use Cases
- Pause during video calls (Zoom, Teams) to reduce CPU usage.
- Pause during gaming or intensive applications.
- Save battery by pausing on battery power.
- Reduce distractions during presentations (fullscreen pause).
Dynamic Wallpaper
Automatically rotate through your wallpapers at set intervals.
Setting Up
- Go to Preferences → General → Dynamic Wallpaper.
- Enable "Enable Dynamic Wallpaper".
- Choose a change interval (5 minutes to 24 hours).
- Optionally enable "Only Favorites" to rotate only favorited wallpapers.
- Select preferred categories if you want to limit rotation to specific categories.
Categories
- When categories are available, you can select which categories to include in rotation.
- Use the category chips to toggle categories on/off.
- Wallpapers without categories are excluded when category filtering is active.
Preferences
Configure app behavior, performance, and integrations.
General
- License: Activate your Keyforge license key.
- Dynamic Wallpaper: Configure automatic wallpaper rotation.
- Performance & Behavior: Pause settings, safe area respect, Three.js toggle, memory management.
Displays
- View all connected displays.
- See current wallpaper assignments per display.
- Clear or preview assignments.
- Reapply all assignments manually.
Integrations
- Marketplace: Sign in with your license, set account email, test connectivity.
- Aerial Screensaver: Detect installation, sync videos, configure custom folder.
- Ollama: Configure local AI server URL and default model.
Automation
- Enable/disable automation.
- Configure per-app pause rules.
- View and manage paused apps list.
About
- View statistics (total wallpapers, favorites, last changed).
- Reset preferences to defaults.
- Credits and attribution information.
Aerial Screensaver Integration
Sync your OS Engine video wallpapers to the Aerial screensaver for use as screen saver content.
Setup
- Install Aerial screensaver from GitHub or use the download button in Preferences.
- Open Preferences → Integrations → Aerial Screen Saver.
- The app will detect if Aerial is installed and show its version.
- Configure a custom entry title (default: "OS Engine").
Syncing Videos
- With a video wallpaper active, click "Sync current video to Aerial" in Preferences.
- A symbolic link is created in Aerial's custom videos folder.
- Open macOS Screen Saver Settings and select Aerial.
- Choose your synced video from Aerial's Custom Videos section.
Troubleshooting
- If Aerial isn't detected, ensure it's installed in the correct location.
- Use "Reveal in Finder" to locate the Aerial bundle.
- Use "Open Screen Saver Settings" to configure Aerial in macOS.
License Management
OS Engine uses Keyforge for license activation. You can use the app in trial mode or activate with a purchased license.
Trial Mode
- New installations start with a grace period trial.
- Trial countdown is shown in the main window header.
- During trial, all features work except marketplace uploads.
- Trial users can browse marketplace but cannot upload.
Activating a License
- Purchase a license from the website.
- Go to Preferences → General → License.
- Enter your license key in the text field.
- Click "Activate".
- The license is stored securely in your keychain.
Managing Your License
- Visit Keyforge Portal to manage your license.
- Licenses are tied to your machine identity.
- Contact support if you need to transfer or reset your license.
Troubleshooting
Window Not Visible
- Click the status bar icon and choose "Show Window".
- Or use File → New → New Window from the menu bar.
- Check if the app is hidden in the Dock (right-click → Options → Show in Dock).
No Wallpaper Showing
- Ensure macOS Desktop & Dock → Show Items is set to "On Desktop".
- Check if a wallpaper is assigned to your display (Preferences → Displays).
- Verify you're not in fullscreen mode (automation may pause wallpapers).
- Check if battery pause is enabled and you're on battery power.
- Ensure the wallpaper file exists and is accessible.
Performance Issues
- Enable "Pause on Battery" to reduce CPU usage when unplugged.
- Enable "Pause in Fullscreen" to pause during presentations or games.
- Reduce video resolution or bitrate if experiencing lag.
- Check "Periodic Memory Cache Clearing" is enabled in Preferences.
- Close resource-intensive HTML overlays if using many simultaneously.
Marketplace Issues
- Ensure you're signed in (Marketplace → My Profile).
- Verify your license is activated (Preferences → General → License).
- Use "Test Connectivity" in Preferences → Integrations → Marketplace.
- Check your internet connection.
- Verify your account email is set correctly.
Ollama Not Working
- Ensure Ollama is running (check in Activity Monitor or terminal:
ollama list). - Verify the Base URL is correct (default:
http://localhost:11434). - Ensure at least one model is pulled (
ollama pull gemma2:2b). - Click "Retry" in Preferences to refresh the model list.
- Check Ollama logs for errors.
Editor Issues
- If HTML overlays don't appear, check the HTML syntax in the Inspector.
- Ensure interactive elements have
data-interactiveor<!-- interactive -->. - Save versions frequently to avoid losing work.
- Cardinal positioning won't work; manually drag/resize elements instead.
Keyboard Shortcuts
- ⌘N: New window
- ⌘W: Close window
- ⌘,: Open Preferences
- ⌘Q: Quit application
- ⌘F: Search wallpapers (in library view)